Showing posts with label Equipment. Show all posts

Oh Louie Louet!

Have I mentioned before how wonderful my lovely husband is? Of course I have but it should be mentioned again. He is pretty awesome. He has surpassed himself this time by getting me a drum carder for finishing my exams. I spotted a Louet drum carder on ebay going for a bargain price and ended up getting it. I feel a bit guilty about the whole affair really.

It arrived packaged very securely in a big box this morning. The postman arrived at the ungodly hour of 7.45 and woke me up so he only had himself to blame for the sight of my bed head that greeted him at the door. Since I was up I decided to unpack it and it looked great, I decided to grab some alpaca fleece and try to card it. This didn't go well. I couldn't get the fiber to latch on to the carder at all and managed to scratch the table as I hadn't secured the carder to the table properly with the clamps.

Let's back up from this disaster and have a quick cup of coffee and look at why I wanted this carder in the first place. Carders are cool machines that align fiber for spinning, they also blend different fibers and colours making a fiber preparation called a batt. They are expensive but they tend to last forever so they're an investment that can be used for a long time. See how I convinced myself? They are quicker than hand cards and batts are lots of fun to spin from. The drum carder I got is a Louet Classic carder, it's got a coarse cloth with 46tpi, the tpi refers to the number of pins or tines per inch. Intertwined, the bible of art yarn spinning, recommends this carder for crazy carded batts as it will deal with whatever you put into it. I want to make mad batts so I was stalking ebay and keeping an eye out for a Louet classic as a new one was definitely out of the price range. I've been looking over a year and haven't seen one. The cheapest new carder I've seen is an Ashford but they don't suit art batts so when the Louet popped up on ebay I jumped at it.

After coffee and figuring out if I could blame the table scratches on the dog I set up the carder outside on the crap plastic outside table. I realised I'd been turning the handle the wrong way and magically the fiber started feeding onto the drum.  After some messing around I carded a batt of white alpaca fiber and then did a batt of brown alpaca mixed with some various bits of greenish merino and a tiny touch of sparkle.  It's a little more brown than the photos. It turned out pretty well for a first go, it looks spinnable from anyway. It's called Forest Nymph which is a bit whimsical for me but that's what came to mind when I finished it.

The carder will help a lot with processing the alpaca fleeces.  I'm hoping to wash and dye the fleece in batches then blend the colours and card them using the carder. I'm also keeping fabric scraps and cast offs from Penneys and stuff to use in funky art batts. Can't wait.

It's got to the stage that with all this fiber stuff and know how I've collected over the last year or so I'm thinking that this hobby should start paying for itself. I'm hoping to set up an Etsy shop at some stage this summer, watch this space for that.


Raised Hackles

After reading Deb Menz's book Colour In Spinning I wanted a hackle. What on earth is a hackle I hear you ask? It's a slightly scary, well very scary looking piece of equipment used for blending and combing fibres. They're particularly good for blending combed top which is one of the most common types of fibre you can get. They're also quite expensive. I was reading a thread in the art yarn spinners group on Ravelry which had a link to this tutorial where someone has made a hackle themselves cheaply.

Being financially challenged at the moment I decided it was worth giving it a go. It wouldn't cost much and would be a very useful piece of kit if it worked.

First I needed a load of hair combs. These were surprisingly difficult to find. I even checked the Afro-Caribbean shops on Moore St to no avail. I do think they thought I was slightly mad looking for a load of hair combs since my hair is very short. I found that they sell all kinds of tat on Moore St these days though. Eventually I found the right combs in Dunnes Stores and I grabbed five of them.

I got some metal self tapping screws and some clamps from the DIY shop. I found a piece of wood in the back of the shed that would work as base to screw the combs onto. All in all it cost less than twenty euro.

Dave was enlisted to help and he drilled two holes in each comb then screwed the comb onto the wood while I held the comb in place. It was pretty easy and didn't take very long. The real question was, would it work? 

It always amazes me that you can learn all sorts of things online that you never could without the internet. I don't know anyone person who even knows what a hackle is let alone someone who knows how to use one. You Tube however comes to the rescue with this video.


I lashed on the fiber like in the video. This is a selection of merino that was part of a mixed bag from The Yarn Room.  I used this fiber before when I carded it with some alpaca and got a nice fuzzy yarn. Actually I just looked back through the blog and I seem to have forgotten to write anything about that yarn. Ah well I'm sure it will show up here soon having been turned into a hat or something. 


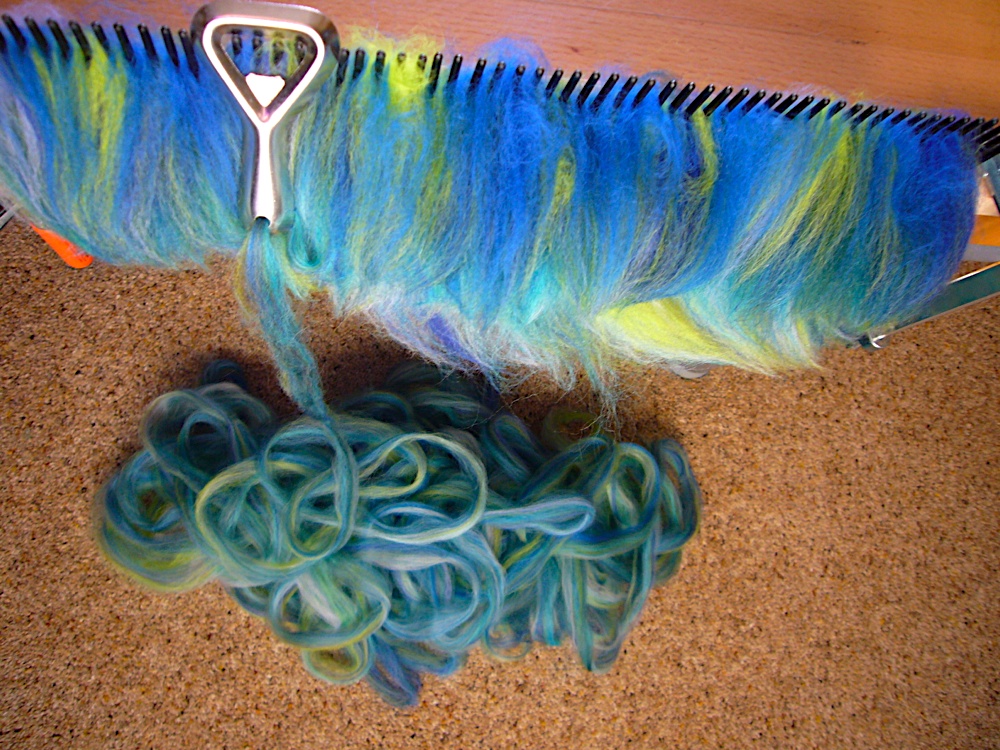
I put different colours on in layers building them up until the combs were full. I then pulled the roving and threaded it through my diz. Now I hear you ask, what is a diz? Does spinning require you to learn a different language? Sometimes it feels like it. A diz is used to take fiber off a comb or hackle. It's just something with a small diameter hole so that the fiber comes out the same width when pulled through it. Lacking anything else I used a bottle opener that was handy.


Something magic happens when you pull the fiber off the combs. It all gets blended and mixed up together. I think the colours when mixed are much nicer than the individual ones. I pulled off all the fiber and rolled it up into two big balls. I'll spin these up on the wheel soon. 

The hackle was a success for something we knocked together so quickly. I think it will only work on prepared fleece as too much tugging on the combs would probably break them. I want it for blending fiber and it's perfect for that. So now that I know it works for top I'm going to start blending some of the fiber I have with fun stuff like angelina, silk noil, ribbons, sequins etc.  


Cold Weather Kolsch, Better Bottles and A Suspect Yeast Choice

More brewing! It's the season for beer after all. Ed, a friend of mine wanted to see an extract brew in action before he does one. He's been very successfully brewing kits for a while now so he knows a lot of it anyway. I ordered some stuff from the Homebrew Company which as always are great to deal with.

I thought Ed was brewing his own beer with me supervising but it turned out I was brewing for me. Since it's been so cold I thought I could make a lager. But I had no lager yeast, if I'd known I'd have got some. So in the absence of lager yeast I decided to use ale yeast and ferment cold to make a kolsch or blonde ale style beer. I raided the freezer and came up with some german hops.

Recipe:

10 Liter batch

Muntons Light Dried Extract 1kg

Hops:
60 minutes - 17g Hallertauer (2.1%AA)
20 minutes - 20g Tettnang (4.5%AA) and 18g Halltertauer
5 minutes - 9g Hallertauer and 6g Tettnang

Yeast: Danstar Nottingham

OG: 1.040
The alcohol should turn out at about 4% ABV


During the boil the lads disappeared upstairs to watch the rugby leaving me to the brewing. I did manage to get them into the kitchen for the last bits where the wort was chilled and transferred. The yeast was pitched and Ed took a well earned break with a nice Clotworthy Dobbin.


I'm fermenting this brew in a Better Bottle. I got three of these for fermenting beer and mead in. I'm very pleased with them so far. They are light which when you're a weakling like me is a big advantage over heavy glass carboys. I am prone to dropping things that are heavy. Dropping a heavy plastic bottle of beer is annoying but dropping a glass carboy would probably mean a trip to accident and emergency.

This evening I transferred Westley's Winter Warmer to secondary. The better bottle made this very easy. I just attached a hose and opened the tap, also the clever valve means you can get the last of the beer out and not lose so much. I checked the gravity, it's down to 1.014 which gives it an alcohol of 5.7% ABV. This should rise a little in secondary. It should be ready to bottle just before christmas. The better bottle was very easy to clean too.

Of course we had a taste of the beer. It's shaping up nicely, spicy with oranges and stronger than I normally brew. There's a hint of spiciness but I would have liked more fruity yeast character with it. I think I should have used a belgian yeast like Safbrew S33 which I had in the fridge. It would have been more complex and fruity like Westmalle or something. Instead I used Nottingham as in theory it wouldn't interfere with the spices. Maybe I should have went mad and used the S33. Though when it's bottled and carbonated it might be a different story. I might be saying I'm glad I used the Nottingham.